|
RecipesGlaze Recipes, Slip Recipes and other recipes for use in the ceramics studio . Cone 10 as well as Low Fire Range recipes used in the RC studio and elsewhere.
|
|
DemosDemo Videos for beginning ceramics classes as well as intermediate digital projects.
|
General Studio Etiquette and Operation.
Kiln Operation and Safety
These are general guidelines and intended for educational understanding of the equipment used in the ceramic process. Students should consider this general information and understand the terms and ideas.
Loading and Unloading:
Kiln Shelves.
All kiln shelves should be loaded into the kiln using the 3 point posting method. Using the 3-point system will help reduce sagging caused by high temperature firing of kiln shelves. Balancing of the kiln shelves is also much easier when using 3 points of contact rather than 4.
Please use Mullite/Coiderite (white-ish) shelves for bisque and Cilicon Carbide (black) shelves for high fire/glaze.

Images Credit: Axner Pottery Supply
Stacking Kiln Shelves.
When you unload kiln shelves that have been coated in kiln wash you must stack them face to face or back to back. This means that you put the washed sides together. This prevents kiln wash from being rubbed onto the bottoms of the kiln shelves. If kiln wash gets stuck to the bottoms it will often fall off during the firing and land in or on work. Kiln wash cannot be easily removed from glazed and fired surfaces. Even if it is removed there will be a blemish in the glaze that will be permanent.
Coating kiln Shelves with Kiln Wash.
Kiln wash is a coating of refractory material that aides in keeping glaze runs or glazed pieces from sticking to the kiln shelf. We ONLY coat one side of the shelf. If old kiln wash is flacking or falling off it is time to re coat the shelves. You should carefully grind old kiln wash away with a grinder to produce a flat smooth surface, only then should you re-coat the shelf with Kiln wash. Use a brush or paint roller coat the shelf with Kiln Wash, then wipe down the edges of the shelves with a damp sponge to remove any runs or drips. Do not allow wash to coat the edges of the shelf and be fired. These drips often fall of and land into glazed pieces causing unfixable blemishes.
Basic Recipes for KILN WASH.
Apply thin even coats.
Reduce water to create a stiff body for wadding
50% Alumina Hydrate
50% EPK
Non Salt/Wood Recipe
49% EPK
49% Silica
2% Betonite
Cone Packs/Cones.
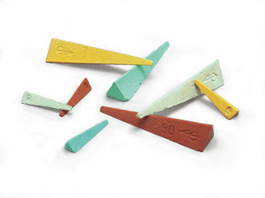
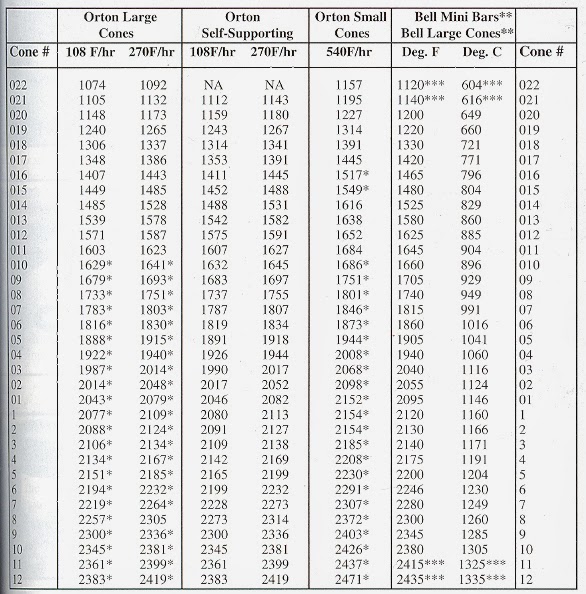
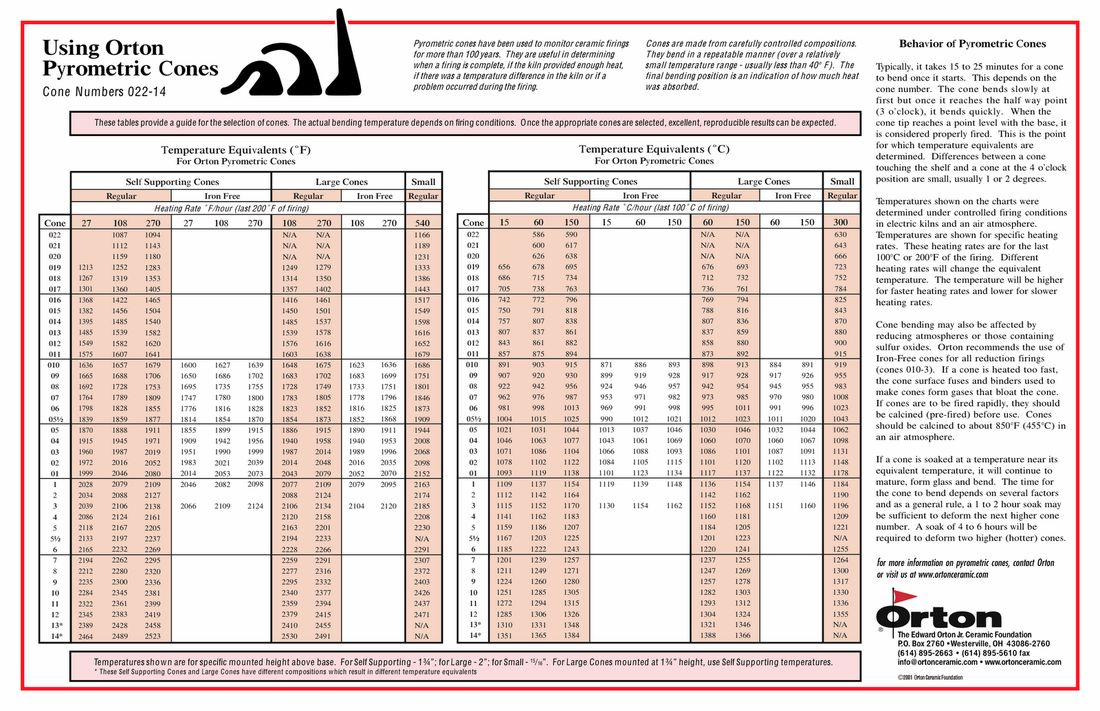
Orton Pyrometric Cones
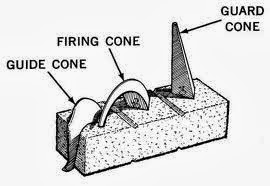
Pyrometric cones are small bars of clay that are formulated to melt at a specific temperature and they also register heat work (the effect of long exposure to high temperatures). We use these CONES to indicate the temperature inside the kiln and to monitor the progress of the firing. The use of more than one cone is highly recommended. By adding more than your target cone (cone that we are firing to) you can get information to the progress of the firing. For example; if you were firing to cone 10. You might also add a cone 9 and 11 to your pack. The addition of the 9 cone (guide cone) will give you a warning you are approaching your target cone, allowing you to stay close to the kiln and monitor the final time of the firing so you do not over fire your work. The addition of the 11 cone (guard cone) will tell you where to stop and not go beyond.
In this case our cone pack would consist of a 9,10,11 cones. Additional cones can be used to add more warning/guide time to the firing process.
You can also use a guide, target and guard cone for you bisque firing.
If you were firing to cone 04, you might use 06,05,04,03.
I have added an additional guide cone due to the fact that lower temp firing progress much quicker towards the end. I would want to have an additional warning time my firing was coming close to finishing, so I would add more guide cones to for-warn me of the finishing stages of the firing.
|
|
Kiln Etiquette.
Before/During Firing
Check with Instructors or Lab Tech to make sure the kiln is available for use. If you have extra space in the kiln you should ask for addition ware to fill the kiln. (do not fire half empty kilns). Once you have loaded and begin you firing make sure you tag your kiln with a legible note stating your name, Contact info, temperature and the dates you will enter and exit the kiln.
After Firing
When you are done firing a kiln your should unload the kiln when it is cool enough to handle the ware and shelves without gloves. You should put back kiln posts to their proper location, you should also stack kiln shelves neatly on edge, face to face, back to back. If there has been any glaze runs or drips you must grind and re-wash shelves or posts. You should also vacuum the kiln if there is any debris left from your firing. Close the door and latch it.
Firing The Kiln:
Lighting the PILOT LIGHT. (GAS KILNS)
Understand there are many procedural variables depending on the type of kiln being used. These guidelines apply to the kilns we have here at COS and Reedley College.
You must have the kiln door and damper open when you light the kiln! You do this to prevent the buildup of gas in an enclosed space. Lighting a kiln with the door closed can lead to an explosion making such practice very dangerous and potentially fatal.
All of our kilns use BASO Safety valves. To light the pilot light on a BASO Valve you must do the following:
1. Turn Pilot Valve to open.
2. Firmly press and HOLD red button on valve body.
3. Firmly and quickly push the red ignition button mounted on kiln. You should hear an audible click. Tis click is the spark mechanism.
4. Look to visually inspect that the pilot light has been lit. (if the pilot has not been ignited, repeat steps 1-3)
5. IF the pilot has been lit, continue to press in and hold red button on BASO Valve Body for 30 seconds. After 30 seconds you can release the button and check to see that the pilot remains on. If not Repeat steps 1-5, if pilot refuses to stay lit after you release the BASO button, locate studio Technician for help. (the valve may be faulty and need replacement) DO NOT BYPASS THE BASO VALVE!
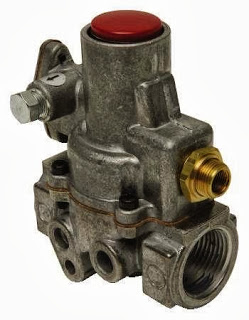
Red Button on BASO Valve. Press and hold for 30 Seconds after ignition.
BASO Valve Body
Lighting The Burners (GAS KILNS)
Once you have successfully loaded and lit the kilns pilot light you will then light the main burners. In order to do this you must follow the following steps.
1. Make sure door and Damper is OPEN!
2. Turn YELLOW valve to begin gas flow into ignition ring ( the ignition ring is a burner tube that distributed flame to each burner in order to ignite the gas in each burner) Turn valve to maximum level.
3. Turn RED Burner Valve to 50% level (half on) and allow each burner to ignite. (Visually inspect through open door)
4. Once all burners have ignited, turn OFF the YELLOW valve. The ignition ring is no longer needed. (do not fire kiln with ignition ring on, it will cause damage to bottom of kiln structure)
5. Begin to reduce gas flow by turning RED VALVE back to low position. As you turn the valve you will notice the size of the flame in each burner get smaller and smaller. Turn down the gas until you have a 6 inch flame flickering into kiln.
6. Your burners are now lit and you can begin your firing.
Beginning Your Firing Schedule. (GAS KILNS)
Once you have successfully loaded and lit the pilot light for your kiln it is time to begin firing. Depending on what you are firing and the temperature you wish to fire to, there are many schedules you can follow. (Firing Schedule=time line for firing, firing plan) You will need to use pyro metric CONES to monitor your firing. Make a cone pack with 3 Cones. Two guide and a target
I will include some basic schedules for bisque and high-fire firings in our gas kilns. These schedules are simple guidelines for generic firings. I will encourage you to develop you own schedules for your individual needs and work produced. If you have questions please ask an instructor or Tech for advice before you proceed to fire. Large work and wet work require special attention. The following schedules can be used for small-scale vessels and small to medium sculpture. These schedules should not be used for LARGE or WET WORK!
Please plan Ahead. You will be required to attend to you kiln for the duration of firing (minus over night candling). Expect to load one day, fire all the next day, cool over night and unload the following day. This mean you will have a 3 day schedule.
Terms:
Candling: turning the burners on very low (2-3 inches of flame) to allow kiln to warm very slowly and drying of pieces. This can be done to minimize explosion of wet work.
Bumping The Kiln: This refers to making small increases in gas pressure. So small they do not register on gas gauge. This is usually done at beginning of bisque firing, when you are making small adjustments to slowly raise the temperature. Tapping on the valve to open a small fraction usually works to “bump”. You will need to visually inspect the flame to measure your “bumping”.
Unloading of HOT Work.
Do not rush to unload your kiln. Allow the work to cool as slowly as possible. Slow cooling will reduce thermal shock and prevent cooling cracks and dunting. (no ring)
If you open the kiln to inspect the firing and you notice the work is still too hot to handle, close the door or leave it slightly cracked open (1 inch or so) and open the damper plate an inch as well. This will allow the kiln to cool, but slower than if you opened the door wide. I do not recommend cooling the kiln faster than needed. That said there may be times you need to pick up the pace. Use caution and understand you are putting your work at risk of damage. Do not do this with other students work unless everyone agrees to the faster cooling. I do not recommend this process with glazed work at all. Bisque ware can handle thermal shock better than vitrified clay, but use caution and do so at your own risk to your work. If your kiln is loaded with silicon carbide shelves avoid quick cooling. I have noticed that these types of shelves react poorly to rapid temp drops over time, reducing their life cycle.
General rule of thumb: If the work is too hot to handle with you bare hands. The work is too hot to remove from the kiln. Allow it to cool longer. Removing hot work will result in ware cracking and can result in the damage of the kiln as well as your work.
As things heat they expand and as the cool they shrink. Quick expansion or contraction of a surface can result in the beginnings of cracks that will eventually lead to the fracturing of your work, kiln shelves, posts, and kiln bricks. DO NOT SHOCK THE KILN BY QUICK COOLING!
Oxidation And Reduction Firing.
Terms:
Oxidation: When the oxygen to fuel ratio is in a balance that allows for complete combustion of fuel used to fire the kiln (natural gas in our case).
Reduction: When the oxygen to fuel ratio is imbalanced with excess fuel. The fuel removes chemical oxygen from clay and glaze for combustion and leaves carbon in behind.
Reduction firing.
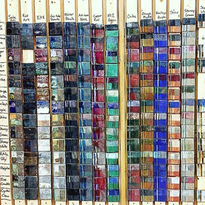
Many of our high fire glazes require a reduction atmosphere to develop the colors you see in the test tiles. This chemical reaction caused by oxygen consumption and residual carbon from combustion causes the glazes to change to different colors than they would be if fired in an oxidation firing.
The process of firing reduction is relatively simple. Once you have reached CONE 06 – 04 you begin to reduce the kiln. There are few reasons to reduce before this temperature, all of the studio glazes had reduction from CONE 04 till shutdown at CONE 10. By adjusting the gas pressure and flue opening (damper plate) you can cause a kiln to go into reduction.
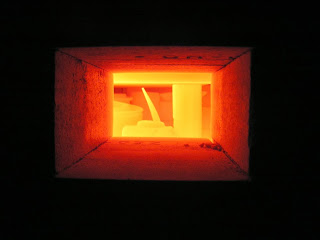
How to spot reduction.
At high temperatures (1800 and above) it is easy to visually read the atmospheric conditions in the kiln. We can visually see the atmosphere thickening and becoming hazy through the peephole. We can also begin to see a flame from the flue when we begin to incrementally close the damper plate. [ In most cases our kiln should have about a 6 inch steady flame coming from the flue during the reduction part of the firing. ]
Putting the kiln into reduction.
Putting a kiln into reduction requires patience and observation. [Keep notes about how high your gas pressure is, the temperature of the kiln as you make adjustments and the damper settings. These notes will allow you to learn the process and help you spot problems, as well as make your results repeatable with less effort.] When you have reached CONE 04 you can begin to adjust the damper plate to initiate reduction. By closing the damper plate you are bottle necking the exit of the kilns combustion gasses. This in the most basic terms causes reduction to begin. Make a small adjustment to the damper plate and then wait a minute and allow the effect of you adjustment to take place. If you see no reduction at this point, make another small adjustment to the damper and again wait for the visual conformation of reduction. Do this until you deign to see a small flame from the damper or a push of gas pressure from the peepholes.
[Each time you adjust you gas pressure you will throw the ratio of fuel to oxygen off thus affecting the reduction atmosphere in the kiln, requiring you to adjust your damper to balance your reduction levels.]
Finishing the Firing.
When the Firing is complete (target cone has bent, tip touching base) you need to shut down the kiln. To do this you need to follow these steps.
1. Turn off main burner valve (RED VALVE).
2. Make sure Ignition Ring is OFF (YELLOW VALVE)
3. Turn off pilot valve (on BASO Valve Body)
4. Close Damper Completely
5. Plug Peephole
At this point the kiln will be shut down and you can begin to slowly cool the kiln.
Cones And Temperature Equivalents/Charts.
Do not rush to unload your kiln. Allow the work to cool as slowly as possible. Slow cooling will reduce thermal shock and prevent cooling cracks and dunting. (no ring)
If you open the kiln to inspect the firing and you notice the work is still too hot to handle, close the door or leave it slightly cracked open (1 inch or so) and open the damper plate an inch as well. This will allow the kiln to cool, but slower than if you opened the door wide. I do not recommend cooling the kiln faster than needed. That said there may be times you need to pick up the pace. Use caution and understand you are putting your work at risk of damage. Do not do this with other students work unless everyone agrees to the faster cooling. I do not recommend this process with glazed work at all. Bisque ware can handle thermal shock better than vitrified clay, but use caution and do so at your own risk to your work. If your kiln is loaded with silicon carbide shelves avoid quick cooling. I have noticed that these types of shelves react poorly to rapid temp drops over time, reducing their life cycle.
General rule of thumb: If the work is too hot to handle with you bare hands. The work is too hot to remove from the kiln. Allow it to cool longer. Removing hot work will result in ware cracking and can result in the damage of the kiln as well as your work.
As things heat they expand and as the cool they shrink. Quick expansion or contraction of a surface can result in the beginnings of cracks that will eventually lead to the fracturing of your work, kiln shelves, posts, and kiln bricks. DO NOT SHOCK THE KILN BY QUICK COOLING!
Oxidation And Reduction Firing.
Terms:
Oxidation: When the oxygen to fuel ratio is in a balance that allows for complete combustion of fuel used to fire the kiln (natural gas in our case).
Reduction: When the oxygen to fuel ratio is imbalanced with excess fuel. The fuel removes chemical oxygen from clay and glaze for combustion and leaves carbon in behind.
Reduction firing.
Many of our high fire glazes require a reduction atmosphere to develop the colors you see in the test tiles. This chemical reaction caused by oxygen consumption and residual carbon from combustion causes the glazes to change to different colors than they would be if fired in an oxidation firing.
The process of firing reduction is relatively simple. Once you have reached CONE 06 – 04 you begin to reduce the kiln. There are few reasons to reduce before this temperature, all of the studio glazes had reduction from CONE 04 till shutdown at CONE 10. By adjusting the gas pressure and flue opening (damper plate) you can cause a kiln to go into reduction.
How to spot reduction.
At high temperatures (1800 and above) it is easy to visually read the atmospheric conditions in the kiln. We can visually see the atmosphere thickening and becoming hazy through the peephole. We can also begin to see a flame from the flue when we begin to incrementally close the damper plate. [ In most cases our kiln should have about a 6 inch steady flame coming from the flue during the reduction part of the firing. ]
Putting the kiln into reduction.
Putting a kiln into reduction requires patience and observation. [Keep notes about how high your gas pressure is, the temperature of the kiln as you make adjustments and the damper settings. These notes will allow you to learn the process and help you spot problems, as well as make your results repeatable with less effort.] When you have reached CONE 04 you can begin to adjust the damper plate to initiate reduction. By closing the damper plate you are bottle necking the exit of the kilns combustion gasses. This in the most basic terms causes reduction to begin. Make a small adjustment to the damper plate and then wait a minute and allow the effect of you adjustment to take place. If you see no reduction at this point, make another small adjustment to the damper and again wait for the visual conformation of reduction. Do this until you deign to see a small flame from the damper or a push of gas pressure from the peepholes.
[Each time you adjust you gas pressure you will throw the ratio of fuel to oxygen off thus affecting the reduction atmosphere in the kiln, requiring you to adjust your damper to balance your reduction levels.]
Finishing the Firing.
When the Firing is complete (target cone has bent, tip touching base) you need to shut down the kiln. To do this you need to follow these steps.
1. Turn off main burner valve (RED VALVE).
2. Make sure Ignition Ring is OFF (YELLOW VALVE)
3. Turn off pilot valve (on BASO Valve Body)
4. Close Damper Completely
5. Plug Peephole
At this point the kiln will be shut down and you can begin to slowly cool the kiln.
Cones And Temperature Equivalents/Charts.